WODdoc Episode 133 Project365: SLAP Tear Rehab; Part 2
In episode 132 we discussed the mechanism of SLAP tears and downward spiral they go through when left untreated.
1. SLAP Tearing = Anterior Shoulder Instability
2. Anterior Shoulder Instability leads to posterior cuff hypertonicity (tight tissues)
3. Prolonged hypertonicity leads to Pain
4. Painful things don’t function well which leads to altered biomechanics
5. Cycle restarts — more instability — more hypertonicity — more pain — etc.
I also said that yesterday’s program was in the middle of the road and that we could either progress (make it harder) or peel back (make it easier) if necessary.
Two important notes:
1. These exercises should not cause severe pain. 2. These exercises are done light to avoid activation of prime movers (the big muscles).
If the protocol in Episode 132 caused you pain:
Don’t do that protocol!!! A lot of times athletes are not ready to go overhead period. It’s a vulnerable position for the shoulder. A better position to start with is with our shoulders down by our sides. All the exercises done today should not bother the SLAP tear athlete (or at least not as much) because it keeps the shoulder in a pretty happy position.
Step 1: Muscle Mash … Don’t mash blind … Know Your Anatomy
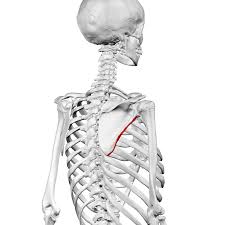

Pictured: The red line is the lateral scapular boarder (its where you should be rolling). The highlighted tissue is the muscles we collectively call the posterior cuff (top to bottom: infraspinatus, teres minor, teres major)
Step 2: Posterior Cuff Activation : Modified Brugger
This is a peel back of my favorite shoulder stability exercise, the brugger. Key points are palms up, thumbs out, and shoulders down. The balls are a necessity to start with because they really allow you to get the feeling of the reverse shrug…. that’s where the magic happens.. thats where we get LOWER trap activation…. We want zero UPPPER trap activation here, so any shoulder shrugging is a NO GO!
Step 3: Internal Rotation Mobility : Sleeper Stretch
Remember posterior cuff hypertonicity leads to IR limitation. We don’t want that so here is a way to mobilize into IR while staying in a very non-adjatative position. **Remember position your body so that your scapula is laying flat on the table (not your body)… your basically pinching your shoulder blade between the table and your ribcage but this is what keeps the joint stabilized and reduces torque in other vectors. Then, just find a gentle barrier and begin your contract/relax protocol from there.
Today’s WODdocket:
1. Muscle Mash (2-4 mins) posterior cuff
2. Modified Brugger (2 sets 15 reps w/ 5 second hold)
3. Sleeper Stretch (8-10 reps – contract 5secs / relax 10secs)